이번 프로젝트는 라즈베리파이에서 초음파 센서, 부저, 버튼을 이용하여 시각 장애인을 위한 충돌 위험 신호 시스템을 개발하는 프로젝트 입니다.
구현조건
- 버튼을 누르면 초음파 센서가 센서 전방에 놓인 사물까지의 거리를 측정한다.
- 측정된 거리에 따라 소리가 발생하는 주기와 주파수를 달리하여, 사물까지의 거리를 소리 신호로 전달한다.
- 사물까지의 거리가 멀면 긴 주기 (2초)와 낮은 주파수 (131Hz)로 소리를 발생시킨다.
- 반면, 사물까지의 거리가 가까우면 짧은 주기 (0.1초)와 낮은 주파수 (1,046Hz)로 소리를 발생시킨다.
- 버튼을 다시 누르면 초음파 센서가 측정을 멈춘다.
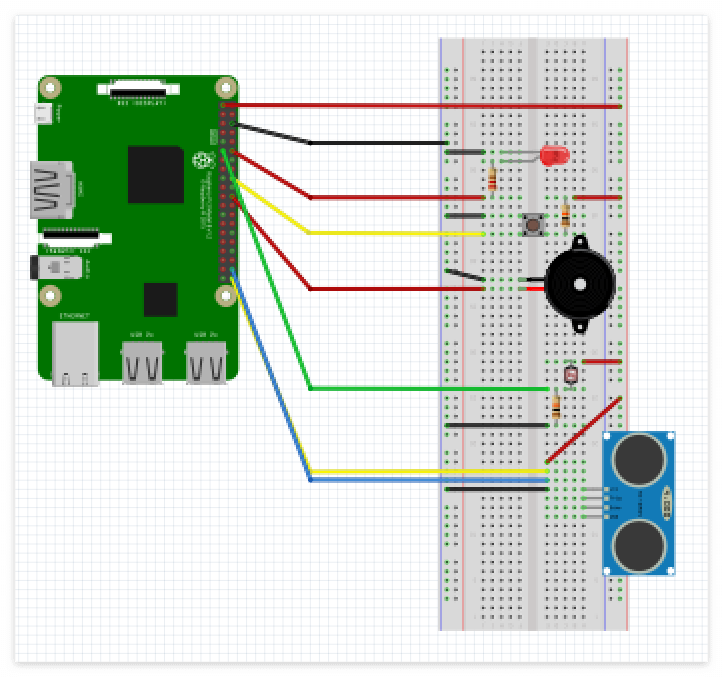
회로도
- LED : GPIO16(12)
- Photo resistor : GPIO17(11)
- Switch : GPIO24(18)
- Buzzer : GPIO25(22)
- HC - SR04 : Trig -> GPIO21(40) / Echo -> GPIO20(38)
DetectionSystem.c 파일을 만들어 코드를 작성해보겠습니다.
#include <wiringPi.h>
#include <stdio.h>
#include <stdlib.h>
#include <stdint.h>
#include <unistd.h>
#include <sys/types.h>
#include <softTone.h>

#define SPKR 6 // GPIO25
#define Button 5 // GPIO24
int TRIG = 29; //gpio 21 pin 40
int ECHO = 28; //gpio 20 pin 38

static int Echo_Test()
{
    unsigned long TX_time = 0;
    unsigned long RX_time = 0;
    float distance = 0;
    unsigned long timeout = 50000000; // 0.5 sec ~ 171 m 50*10^6 us
    unsigned long Wait_time=micros();
    pinMode(TRIG, OUTPUT); //gpio 21 pin 40 using trigger
    pinMode(ECHO, INPUT); //gpio 20 pin 38 using Echo ultra sound
    // Ensure trigger is low.
    digitalWrite(TRIG, LOW);
    delay(50); //mili sec
    // Trigger tx sound.
    digitalWrite(TRIG, HIGH);
    delayMicroseconds(10);
    digitalWrite(TRIG, LOW);
    // Wait for tx response, or timeout.
    while ((digitalRead(ECHO) == LOW && (micros()-Wait_time) < timeout))
    {
        if(digitalRead(ECHO) == HIGH) break;
    }
    // Cancel on timeout.
    if ((micros()-Wait_time) > timeout)
    {
        printf("0 Out of range.micros =%d wait-time=%d \n",micros(),Wait_time);
    //return 0;
    }
    TX_time = micros(); //since call wiringPiSetup, the number of microseconds
    // Wait for rx sound response, or timeout.
    while ((digitalRead(ECHO) == HIGH && (micros()-Wait_time)) < timeout)
    {
        if(digitalRead(ECHO) == LOW) break;
    }
    // Cancel on timeout.
    if ((micros()-Wait_time) > timeout)
    {
        printf("1.Out of range.\n");
    //return 0;
    }
    RX_time = micros();
    // Calculate rx-tx duration to change distance.
    distance = (float) (RX_time - TX_time) * 0.017; //( 340m/2) *100cm/10^6 us
    printf("Range %.2f cm.\n", distance);
    softToneCreate(SPKR);
     if(distance >= 50)
        {
            softToneWrite(SPKR, 1046);
            delay(200);
        }
        else if(distance < 50)
        {
            softToneWrite(SPKR, 131);
            delay(10);
        }
    return 1;
}
int switchControl( )
{
    int cnt =0;
    pinMode(Button, INPUT);
    if(digitalRead(Button) == LOW)
    {
        Echo_Test();
        delay(500);
    }
    return 0;
}
int main()
{
   printf (" HC-SR04 Ultra-sonic distance measure program \n");
    if (wiringPiSetup () == -1) {
        exit(EXIT_FAILURE);
    }
    if (setuid(getuid()) < 0) {
        perror("Dropping privileges failed.\n");
        exit(EXIT_FAILURE);
    }
    for(;;)
    {
        switchControl();
    }
    return 0;
}
코드를 작성하였다면 gcc를 이용해 컴파일하고 실행시켜보겠습니다.
pi@raspberrypi:~ $ gcc -o DetectionSystem DetectionSystem.c -lwiringPi
pi@raspberrypi:~ $ sudo ./DetectionSystem
위의 명령어를 통해 프로그램을 실행 시킬 수 있습니다.
'Project > Embedded Project' 카테고리의 다른 글
| 기억력 도전 게임 프로젝트 (2) | 2023.12.22 |
|---|
